PhotoScan Python脚本开发与使用
一、Python脚本获取
MetaShape(PhotoScan)官方在github上提供了一些脚本,可以保存到本地进行调用。
例如本次想使用的导出密集匹配时生成的深度图,可以在仓库中找到该文件:
1
2
3
4
5
6
7
8
9
10
11
12
13
14
15
16
17
18
19
20
21
22
23
24
25
26
27
28
29
30
31
32
33
34
35
36
37
38
39
40
41
42
43
44
45
46
47
48
49
50
51
52
53
54
55
56
57
58
59
60
61
62
63
64
65
66
67
68
69
70
71
72
73
74
75
76
77
78
79
80
81
82
83
84
85
86
87
88
89
90
91
92
93
94
95
96
97
98
99
100
101
102
103
104
105
106
107
108
109
110
111
112
113
114
115
116
117
118
119
120
121
122
123
124
125
126
127
128
129
130
131
132
133
134
135
136
137
138
139
140
141
142
143
# Exports depth map of each camera.
#
# This is python script for Metashape Pro. Scripts repository: https://github.com/agisoft-llc/metashape-scripts

import Metashape
from PySide2 import QtGui, QtCore, QtWidgets

try:
    import numpy as np
except ImportError:
    print("Please ensure that you installed numpy via 'pip install numpy' - see https://agisoft.freshdesk.com/support/solutions/articles/31000136860-how-to-install-external-python-module-to-metashape-professional-package")
    raise


class ExportDepthDlg(QtWidgets.QDialog):

    def __init__ (self, parent):
        QtWidgets.QDialog.__init__(self, parent)
        self.setWindowTitle("Export depth maps")

        self.btnQuit = QtWidgets.QPushButton("&Close")
        self.btnP1 = QtWidgets.QPushButton("&Export")
        self.pBar = QtWidgets.QProgressBar()
        self.pBar.setTextVisible(False)

        # self.selTxt =QtWidgets.QLabel()
        # self.selTxt.setText("Apply to:")
        self.radioBtn_all = QtWidgets.QRadioButton("Apply to all cameras")
        self.radioBtn_sel = QtWidgets.QRadioButton("Apply to selected")
        self.radioBtn_all.setChecked(True)
        self.radioBtn_sel.setChecked(False)

        self.formTxt = QtWidgets.QLabel()
        self.formTxt.setText("Export format:")
        self.formCmb = QtWidgets.QComboBox()
        self.formCmb.addItem("1-band F32")
        self.formCmb.addItem("Grayscale 8-bit")
        self.formCmb.addItem("Grayscale 16-bit")

        # creating layout
        layout = QtWidgets.QGridLayout()
        layout.setSpacing(10)
        layout.addWidget(self.radioBtn_all, 0, 0)
        layout.addWidget(self.radioBtn_sel, 1, 0)
        layout.addWidget(self.formTxt, 0, 1)
        layout.addWidget(self.formCmb, 1, 1)
        layout.addWidget(self.btnP1, 2, 0)
        layout.addWidget(self.btnQuit, 2, 1)
        layout.addWidget(self.pBar, 3, 0, 1, 2)
        self.setLayout(layout)

        QtCore.QObject.connect(self.btnP1, QtCore.SIGNAL("clicked()"), self.export_depth)
        QtCore.QObject.connect(self.btnQuit, QtCore.SIGNAL("clicked()"), self, QtCore.SLOT("reject()"))

        self.exec()

    def export_depth(self):

        app = QtWidgets.QApplication.instance()
        global doc
        doc = Metashape.app.document
        # active chunk
        chunk = doc.chunk

        if self.formCmb.currentText() == "1-band F32":
            F32 = True
        elif self.formCmb.currentText() == "Grayscale 8-bit":
            F32 = False
        elif self.formCmb.currentText() == "Grayscale 16-bit":
            F32 = False
        else:
            print("Script aborted: unexpected error.")
            return 0

        selected = False
        camera_list = list()
        if self.radioBtn_sel.isChecked():
            selected = True
            for camera in chunk.cameras:
                if camera.selected and camera.transform and (camera.type == Metashape.Camera.Type.Regular):
                    camera_list.append(camera)
        elif self.radioBtn_all.isChecked():
            selected = False
            camera_list = [camera for camera in chunk.cameras if (camera.transform and camera.type == Metashape.Camera.Type.Regular)]

        if not len(camera_list):
            print("Script aborted: nothing to export.")
            return 0

        output_folder = Metashape.app.getExistingDirectory("Specify the export folder:")
        if not output_folder:
            print("Script aborted: invalid output folder.")
            return 0

        print("Script started...")
        app.processEvents()
        if chunk.transform.scale:
            scale = chunk.transform.scale
        else:
            scale = 1
        count = 0

        for camera in camera_list:
            if camera in chunk.depth_maps.keys():
                depth = chunk.depth_maps[camera].image()
                if not F32:
                    img = np.frombuffer(depth.tostring(), dtype=np.float32)
                    depth_range = img.max() - img.min()
                    img = depth - img.min()
                    img = img * (1. / depth_range)
                    if self.formCmb.currentText() == "Grayscale 8-bit":
                        img = img.convert("RGB", "U8")
                        img = 255 - img
                        img = img - 255 * (img * (1 / 255)) # normalized
                        img = img.convert("RGB", "U8")
                    elif self.formCmb.currentText() == "Grayscale 16-bit":
                        img = img.convert("RGB", "U16")
                        img = 65535 - img
                        img = img - 65535 * (img * (1 / 65535)) # normalized
                        img = img.convert("RGB", "U16")
                else:
                    img = depth * scale
                img.save(output_folder + "/" + camera.label + ".tif")
                print("Processed depth for " + camera.label)
                count += 1
                self.pBar.setValue(int(count / len(camera_list) * 100))
                app.processEvents()
        self.pBar.setValue(100)
        print("Script finished. Total cameras processed: " + str(count))
        print("Depth maps exported to:\n " + output_folder)
        return 1


def export_depth_maps():
    app = QtWidgets.QApplication.instance()
    parent = app.activeWindow()

    dlg = ExportDepthDlg(parent)


label = "Scripts/Export Depth Maps"
Metashape.app.addMenuItem(label, export_depth_maps)
print("To execute this script press {}".format(label))
二、将python文件加载到软件
-
在用户文件夹下找到“AppData\Local\Agisoft\Metashape Pro\scripts”路径,将上一步保存的pyhton脚本放在该路径上。
-
如果该python脚本还需要其他的python库,则需要在MetaShape的python环境中调用pip安装需要的python库。
-
具体操作为:在安装路径下“C:\Program Files\Agisoft\Metashape Pro\”中,进入该目录下的python目录,在cmd命令行中安装库文件
1
./MetaShape Pro/python/python.exe -m pip install numpy
-
-
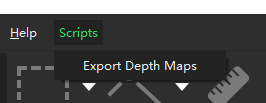
再次打开软件,即可发现菜单栏发生了变化,如下图所示:
